How do I remove the rear wheel from a disc brake bike ?
Introduction
Removing the rear wheel from a disc brake bike may seem a complex operation, but it’s a simple one if you adopt the right method. First, carefully prepare your work area and assemble the appropriate equipment (Allen wrench, gloves), then stabilize your bike on a solid support (ideally a workshop stand). Next, place the drivetrain on the small chainring and sprocket to reduce chain tension. With these first steps, you’ll lay the essential foundations for removing your wheels safely and efficiently, while preserving the integrity of your components.
Required equipment
To successfully remove the rear wheel from a disc brake bike, you need to prepare :
In addition, check that your work surface is completely clean and uncluttered.

Step 1: Preparing the bike
First of all, place the bike on the workshop stand or a stable support. This facilitates the operation and reduces the risk of falling. This precaution is essential for removing the rear wheel without damaging the braking system. In addition, make sure the drivetrain is on the small chainring and sprocket to reduce chain tension. If your bike is equipped with a chain tensioner, set it to the “off” position.
Step 2 : Loosening the thru axle
To continue removing the rear wheel from the bike, use the appropriate Allen key for your model. Turn anticlockwise to unscrew. Most thru axles have a reverse-pitch system on the left-hand side to prevent loosening while riding. However, consult your bike’s manual to confirm the disassembly direction. This will minimize the risk of damaging the thread.
Step 3 : Removing the wheel
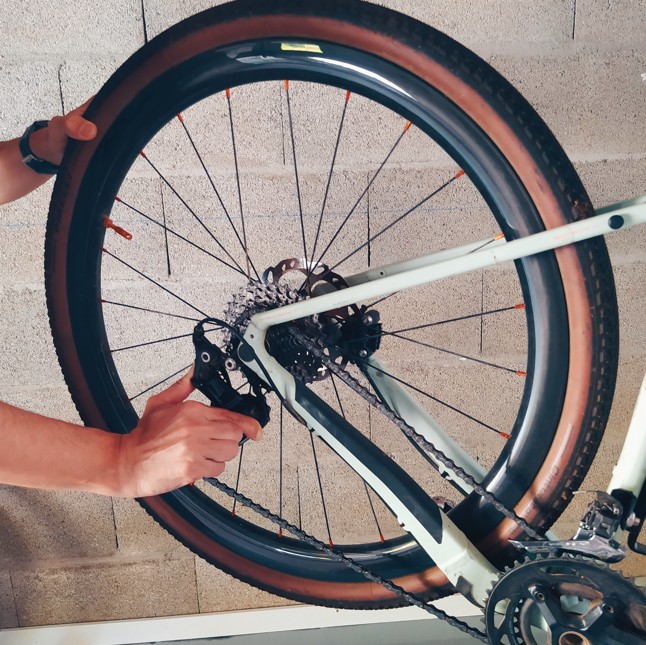
Once the axle is completely loose, carefully remove it. Then carefully lower the wheel to release it from the brake disc. At this stage, the action of removing the rear wheel from a disc brake bike is crucial, as you need to preserve the alignment of the disc. Pull the wheel out, using your right hand to pull back the rear derailleur and your left hand to gently lower the wheel downwards. Make sure that the disc does not rub against the caliper. In addition, immediately place the wheel on a clean cloth to avoid any deformation or soiling.

Step 4: Inspection and servicing
After removing the rear wheel from the bike, take the opportunity to inspect the condition of the disc, rim and hub. Inspect the brake pads too, and clean them with a cloth soaked in isopropyl alcohol if necessary. In addition, lightly grease the thru axle threads to facilitate reassembly. This little gesture will extend the life of your components and make your riding safer.

To learn more about how to maintain your drivetrain, check out the shimano and sram user manuals available online (depending on your equipment).
Tips and reinstalling the rear wheel
Before reassembling the wheel, check that the brake caliper is correctly repositioned and that the disc slides freely. Avoid touching the surface of the brake pads and rotor: greasy substances drastically reduce braking efficiency. To reinstall the wheel, place the chain on the small sprocket, back the derailleur with your right hand and align the disc with your brake caliper. Using your left hand, carefully reassemble the wheel until it stops. Once the wheel is correctly positioned, tighten the axle to the torque recommended by the manufacturer (generally between 12 and 15 Nm). This guarantees a safe and precise assembly. Don’t forget to return your derailleur clevis tensioner to the “On” position, if so equipped. Regular practice in removing the rear wheel from a disc brake bike will enable you to become increasingly comfortable.
Post-operation recommendations
After putting the wheel back on, press the brake control several times to make sure the hydraulic system is working properly. Test your braking at low speed on your next outing, before taking on a more demanding route. Thanks to this procedure, removing the rear wheel from the bike will no longer hold any secrets for you. Finally, schedule a periodic check-up of your braking system to prevent any mishaps.
Conclusion
All in all, removing the rear wheel from a disc brake bicycle is easy when you follow the steps described and have the right equipment at hand. This methodology, combined with particular care during inspection and reassembly, ensures performance and safety. Don’t hesitate to repeat the operation at home to gain in efficiency and confidence. Finally, share this article if you found it useful, and keep pedaling with peace of mind!
If you’d like to discover other tips, advice or tutorials for your bike, visit our blog page.
Looking for high-performance carbon bicycle wheels ? Discover our road models.